Saturday, October 31, 2009

Manufacturing the Chateau Papillon Graveyard, Part 3: Pumpkins

Something Beth and I both used to enjoy about Halloween--for me something going well back to childhood--was carving pumpkins into Jack O' the Lanterns. Back in Blacksburg, we went so far one year as to create a couple of Goomba-style (think the Super Mario video game series) "alien" carvings from strange, mushroom-shaped melons we picked up at a farmer's market.

We've kept such busy lives the past few years, though, that even during our rental home years in Vienna, we didn't get to indulge in sculpting melons into creatures of horror and whimsy. This year, hurried and hectic as it's been, we managed to put together a couple of pumpkins, though--I made a point last weekend of picking several up at Safeway and Sam's Club:

Now who left that knife in the poor Peter Pumpkin's head?I'm not sure quite where I got the original idea for poor Peter Pumpkinhead here and his grisly demise. I think I'd just read through the latest set of hung-over pumpkins making the e-mail rounds (a creative use of pumpkin innards, I must admit, if one that gets recycled each year), and maybe thought back to the scene in It's the Great Pumpkin, Charlie Brown! where Linus bemoans Lucy "killing" the pumpkin with her incision. There's probably even a bit of Calvin and Hobbes' demented snowmen in him.

But at any rate, Peter came out on the wrong end of some argument--perhaps King Eggplant came home and caught ol' Peter in bed with his wife the Summer Squash. That knife didn't just grow from Peter's forehead, though, and his expression of shock at the discovery quickly gave way to a fatal dismay. Poor Peter!

Evil Jack O' the LanternAfter crafting Peter's sorry, sordid tale of death by plastic knife misadventure, I tasked Beth with designing an evil, menacing pumpkin face. The result above does Jack O' the Lantern himself and his cursed fallen soul proud; I took her design and carved a few embellishments (like the slits in the eyes) and the row of gnashing teeth beneath his two vampiric fangs. I'm only surprised Mr. Jack didn't send a few more kids screaming in terror.

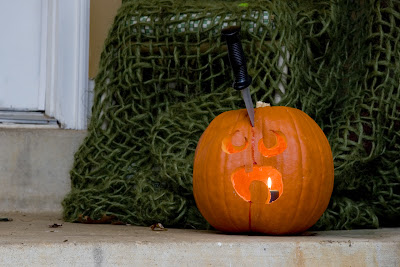
Finally, I wanted to share an after-dark photo of Peter Pumpkinhead. Though in the shadows you can't see the blood running down his gourdy forehead, his tragic expression is rendered that much better.

A successful return of our pumpkin-carving traditions, wouldn't you say?

Friday, October 30, 2009

Manufacturing the Chateau Papillon Graveyard, Part Two: Resurrecting Graveyard Man

Graveyard Man ... by daylightSeveral years ago, Beth and I came up with this creepy figure as part of the decorations at our rental home in Vienna. We'd been out at Fair Oaks Mall and stopped by the Spenser's Gifts store to look at their Halloween selection, and I came across the mask pictured above. It was pricey ($40 if I recall correctly!) but fantastically creepy.

I built an armature out of some heavy-duty wire, added some upholstery foam for structure, and voila--a head to place the mask atop! I also wired in two flicker-flame candle bulbs as eyes (the orange pinpricks seen in the photo above), which really makes the ghoulish gent.

His arms are more sturdy wire, surrounded by a pair of flannel "sleeves" I sewed from some scrap fabric; they're stuffed with plastic grocery bags for volume. As for the title of this piece--Graveyard Man's resurrection--that is a story in and of itself. During our last year in the Vienna rental house, some rats got into the storage shed and ate away Graveyard Man's hands (a pair of monster gloves that fit over the wires). Fortunately, I had the mask safely inside with our costume supplies, but his hands were ruined, and we didn't get him set up at all that year, or last year (since we were in an apartment, waiting out the last two weeks of our short sale purchase of Chateau Papillon).

The hands I found at Spirit this year as replacements aren't perfect, but they work. I still want to add animatronics; the plan is to use a through-shaft motor (e.g. the axle goes all the way through and is on both ends of the motor, not just one end) and two cams to cause his arms to jiggle. I even had the perfect motor at one point, bought as a kid to try to add power to the big plastic van Babykins and his pals drove around in--but who knows what has become of it. Perhaps next year I'll have time.

(p.s.: that's one of the concrete tombstones we cast this year behind Graveyard Man.)

Monday, October 26, 2009

Manufacturing the Chateau Papillon Graveyard, Part One: Casting Tombstones

Ever since childhood, I've enjoyed "do-it-yourself" Halloween decorations. I think it started with some old stereo equipment and "spooky sounds" LPs; I know I made a loop tape from a spooky thunderstorm track on said vinyl and set speakers up in the shrubbery outside my windows, piping out a bit of Halloween atmosphere to accompany the decorations. (I was probably around 7 years old at the time.)

Later displays included hand-painted light bulbs--making up for my allowance not covering fancy colored lights by adding "blood" to plain white incandescents--set up to illuminate a ghost constructed out of a rubber devil's head mask, a white sheet, and a strategically-placed box fan. My sisters got involved as well, and we even drafted some trusted neighbors to help out, with the apex of our work a display (including a too-lively scarecrow seated on the porch, played by my sister Erika if memory serves) terrified a group of the neighborhood kids, sending future reality TV star Ashley McNeeley and several others running screaming down the hill.

My wife Beth and I enjoy decorating even today as adults, and a few years ago put together quite a nice setup at our rental home in Vienna, Virginia, with the centerpiece a zombie we titled "Graveyard Man" built from a wire armature, structural foam, and two flicker-flame bulbs in night light sockets as "eyes" set behind a fantastic latex mask I picked up at Spenser's. The past two years, we haven't gotten to put our ghoulish talents to work; we simply didn't have time in 2007--particularly to rebuild Graveyard Man's hands after a rat got to them in our storage shed!--and in 2008, we were in a temporary apartment (itself a bit of horror, mind you) waiting out the purchase of our new home.

This year, though, despite some rather uncooperative weather, we've gotten back to work, and the centerpiece of the display is to be a graveyard next to the front porch. Whereas in the past we used cardboard boxes, duct tape, and some craft stone-textured spray paint to set up our tombstones, having a home of our own has inspired us to do more. This year, we're making our own concrete tombstones.

Initial steps building the tombstone mold: laying out the sides and kerfed top.The task isn't as hard as you might think, but nor is it as simple as it could be. I wanted to have several of the traditional arc-topped slab tombstones, and we wanted to have carved or etched lettering on them as well. The design would be fairly simple, and concrete isn't that hard to work with; you just need a suitable mold.

From all of our work on renovations and other improvements, we have plenty of scrap wood sitting around, and my table saw made short work of cutting some sides and bottom to make up the tombstone shape; the backing is one of the cheap particleboard shelves I pulled out of the pantry when redoing it with leftover plywood from the library. The trickiest part would be the curved top of the tombstone; no problem with the table saw, though, as I simply "kerfed" a strip of the same scrap plywood used for the sides and bottom.

The space left by the wood cut away by a saw blade is the "kerf," and the technique--commonly used to create curved pieces of wood--makes a series of cuts which almost but not quite go all the way through the wood (leaving a thin veneer atop the cut). As anyone who's made a balsa model knows, thin wood bends easily, and each cut will allow you to bend the piece slightly.

The tombstone mold filled with concrete.Assembling the mold was a bit tedious--primarily because I wanted to make it easy to disassemble and reassemble, as breaking concrete free of a mold can be a challenge. I secured the sides and bottom with as little hardware as possible, instead putting fixed braces along the edges in several places (look at the sides, above). The kerfed top I glued in place and braced at several points to keep the desired shape.

Beth lined the mold with wax paper to ease in breaking the concrete free once it set. In the meantime, I mixed up the concrete itself, combining a ready-mix blend with a shovel of clay-laden dirt from the yard to make the final product more natural in appearance (sculptors will often blend in all sorts of things to achieve artistic effects, such as hypertufa concrete). I used some scrap metal rods as reinforcement, placed into the concrete after filling the mold halfway; I need to track down the leftover wire I used for Graveyard Man's armatures for future castings, or else cut up one of the garden's tomato cages, perhaps.

After letting the concrete set for 15-20 minutes, I pressed in some wooden letters we picked up at Michael's (here, spelling out the traditional abbreviated Latin requiem)... then waited. A couple of hours later, I pulled the letters out, leaving their images behind in the quick-drying stone.

Unmolded tombstone.Fast-forward 24 hours; when I got home from work today, I carefully unmolded our tombstone by placing a slab of scrap plywood over the mold and then inverting both (the wax paper really helped--I barely had to wiggle the mold at all--and didn't have to remove any of the sides to free the set tombstone).

The concrete was still a little "green" despite being a quick-setting variety, so I handled it pretty carefully and set it aside to dry more before we try standing it up in our "graveyard." (We cast a bird bath from some concrete left over from setting posts for our compost bin--so I know the blend I made will firm up quite well despite the addition of dirt as the bird bath mix had dirt and even potting soil mixed in.)

But as you can see from the photo above, it's going to be quite a nice addition to our Halloween display! I cast another one by flashlight this evening (inscribing this one with a date and a stylized cross instead of "RIP"), and we also made a different tombstone shape (a trapezoid) which we plan to use. Only thing is the weight: even though the tombstone is only 2 inches thick and about 12" x 20" in dimensions, it weighs a good 30 pounds or more! Definitely a bit more of a pain to move about than those styrofoam ones sold at megamarts this time of year... but oh so much more realistic.

Friday, October 23, 2009

It Started with the Pepper Mill: Or, Everything Goes to Hell

It started with the pepper mill.

After refilling it with a fresh load of peppercorns, the pepper mill simply quit grinding. I tried cleaning it out, refilling, tightening various bits and pieces of the mill, etc., but unfortunately, the "lifetime warranted" William Bounds pepper mill we've had since around 2004 was, to use a kitchen cliche, toast.

Then the dishwasher went out; the retaining nut holding in place the agitator snapped clean off. This one was fairly simple to fix; I only had to squint at parts diagrams on Sears' Web site for a few minutes and try to match up lines and labels on the figures to the unusual part names and descriptions. Although shipping was a whopping $20 for a $5 part (well, I could have put off using the dishwasher nearly two weeks for only $8.95 shipping and handling--I'm far too impatient for that, and we go through a load of dishes about every day and a half anyway!), once the replacement part arrived, the repair was rather simple.

Then Tabitha, my GPS, developed a severe, progressive, and incurable case of dementia. From stuttering the occasional "t-t-turn right" she went on to depressingly-long bouts of "loading maps" to finally admitting "no data" for requests for anything map related. A course of electroshock therapy (soft- and then hard-resets) failed to clear up this electronic case of Alzheimer's. Eventually, Garmin sent me a replacement under warranty, though the new Tabby is a refurb (a bit loose, if you ask me) and although a newer GPS chipset, a "downgrade" in that the prior one was a quicker-to-acquire, more sensitive version which chatted up the celestial orbiters in 1/4 the time the newer (but I'm sure cheaper) replacement does.

Our server crashed over the same weekend, apparently the victim of a fried hard drive logic board. I tried an identical drive (bought refurb for $40) to swap printed circuits and bring the middle-aged gal out of retirement long enough to recover backups without resorting to pricey data recovery joints, but in the end, we had to send the drive off to ESS Data Recovery and fork out an ungodly sum of money for my mistake in having not made off-system backups for several months.

And my car apparently has a bearing going bad--despite dropping over $2000 into service a month or two ago (a lot of that was on the maintenance schedule, but still...!) I'm debating what I can do to tackle the repairs myself, or if I want to go ahead and fork out the cash to keep the Exerda in good working order.

I just replaced my laptop's keyboard for a third time; maybe it's my typing... but fortunately, e-bay found a brand-new replacement for $15, shipping included, so it was only having to wait a week for the new one to arrive (and mashing the "E" key with extra force in the interim to avoid typing "th quick brown fox" "ovr and ovr" again).

Let's not forget, either, the leak in the backyard pond liner, which so far has received to no avail two complete sealant treatments of the likeliest points of leakage. I've got some ideas to find the leak that go short of buying a new liner sheet entirely, but it's still annoying nonetheless.

If I hadn't gotten a clean bill of health at my physical, I'd be a bit afraid to look myself in the mirror for fear of what might break down next!